How to install UniFi access points via your iPhone
Published onOctober 13, 2023
If you've recently acquired a UniFi Access Point (AP) and are eager to set it up, this guide is for you. Especially tailored for iPhone users, this step-by-step tutorial will walk you through the entire setup process. By the end of this guide, you'll have your UniFi AP configured.
Whether you're setting this up in a home or a small business environment, the process remains straightforward. All you'll need is your iPhone, the UniFi app, and a few minutes of your time. Let's dive in and get your UniFi Access Point up and running!
Table of Contents
- Install UniFi on your iPhone
- Connect your UniFi access point to the network
- Add device in UniFi app
- Configure UniFi access point
- Join Wi-Fi network
Install UniFi on your iPhone
First, download and install the UniFi app from the App Store.
Connect your UniFi access point to the network
- Ensure your network has an active internet connection, as UniFi access points require internet for initial setup.
- Connect your UniFi access point (AP) to the network using an Ethernet cable. It's advisable to connect it to a UniFi PoE (Power over Ethernet) switch if available. If not, you'll need a PoE injector to supply power to the AP.
- If your AP is used or has been configured before, reset it to factory settings by holding down the reset button for at least 5 seconds.
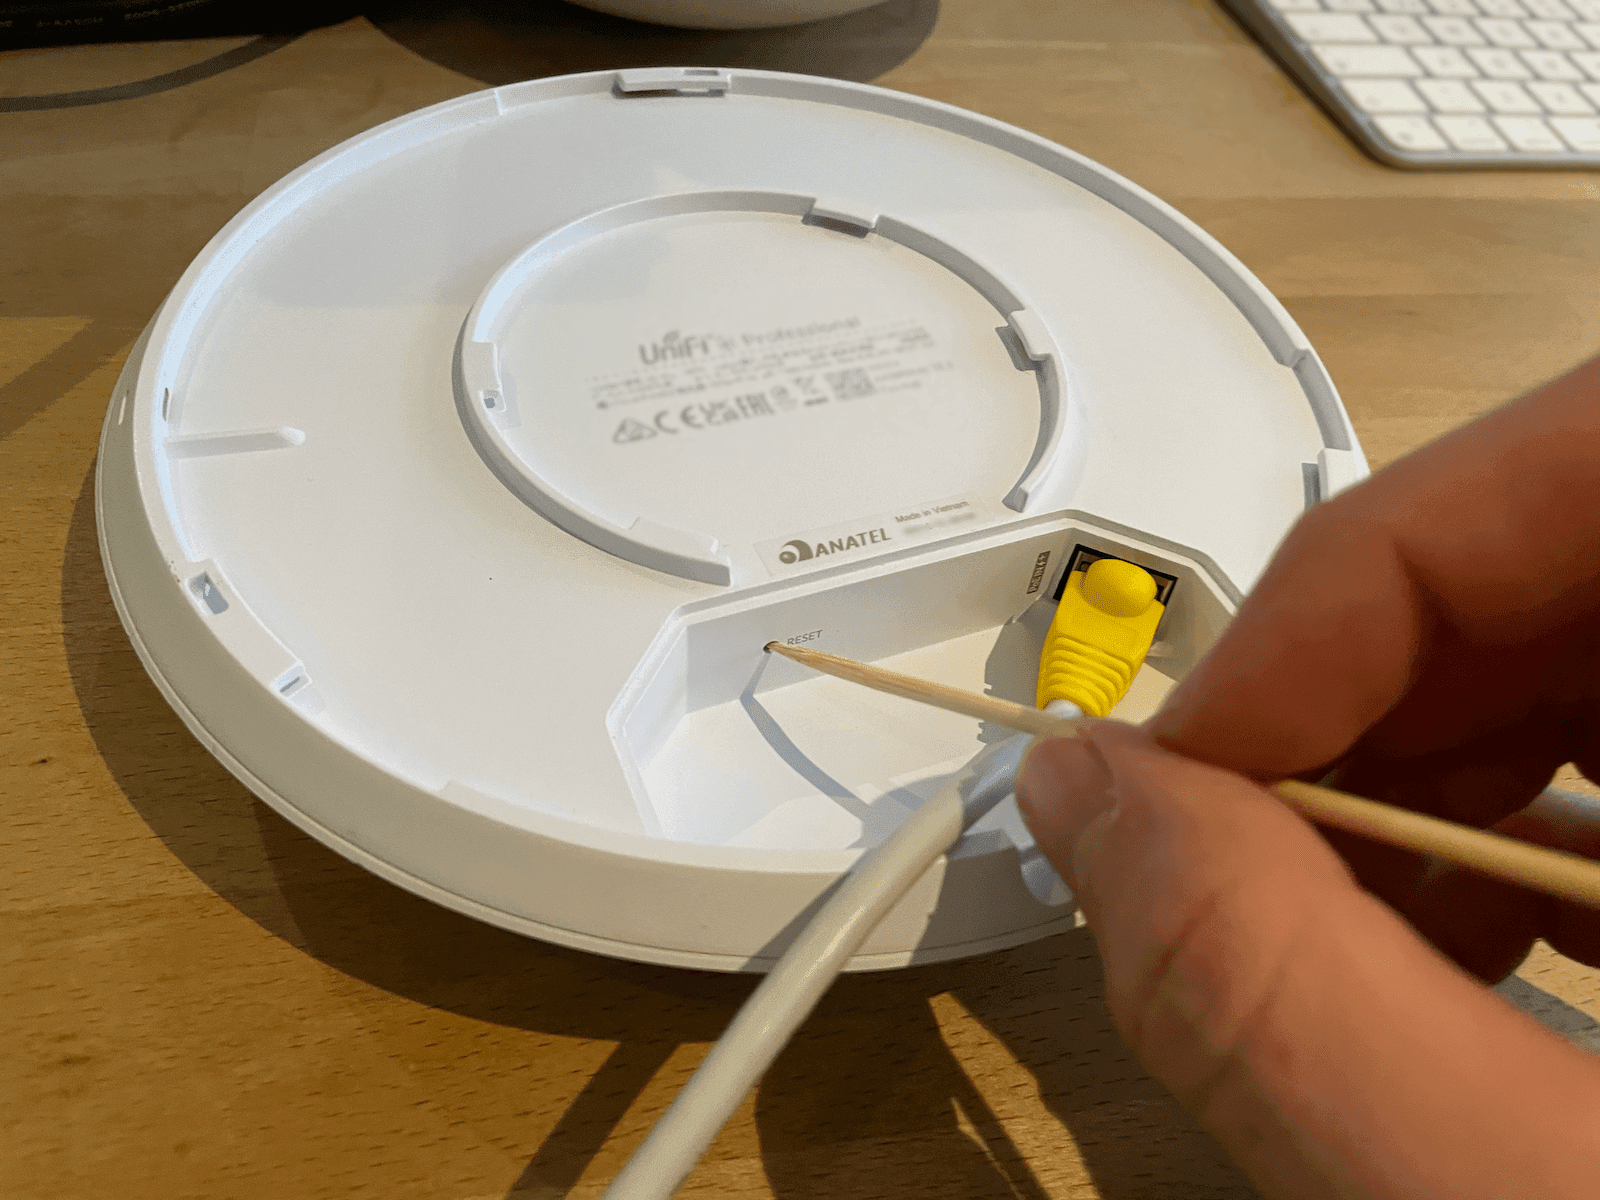
You can reset the AP with the tools you have around :)
Add device in UniFi app
Here are the steps to find and add your access point.
- On your iPhone, make sure Bluetooth is enabled to facilitate device discovery.
-
Open the UniFi app and wait for the device to show up on the main screen.
- If the device doesn't appear, ensure it's powered on and within close proximity to your iPhone.
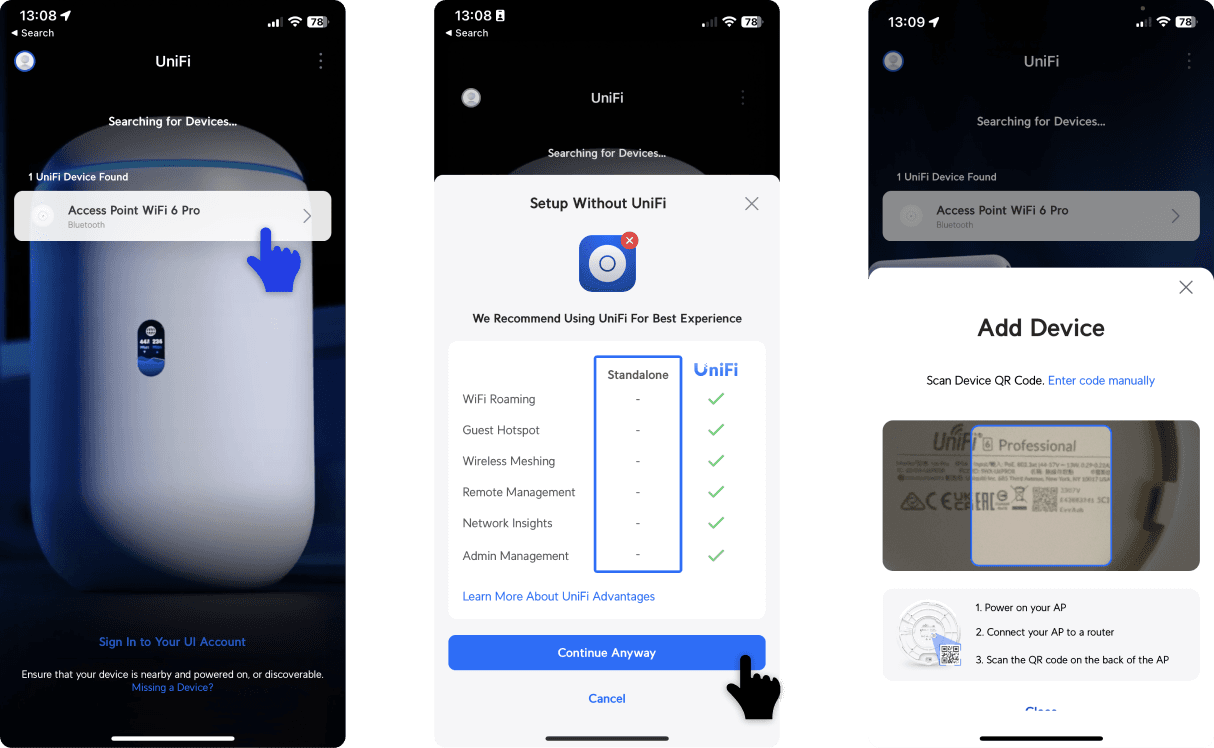
- Once the app indicates "1 UniFi device found," click on that device.
- When prompted for "Setup without UniFi," select "Continue anyway."
-
This will open the "add device" modal, offering two options:
- Scan the QR code on the back of the device
- Enter the code manually.
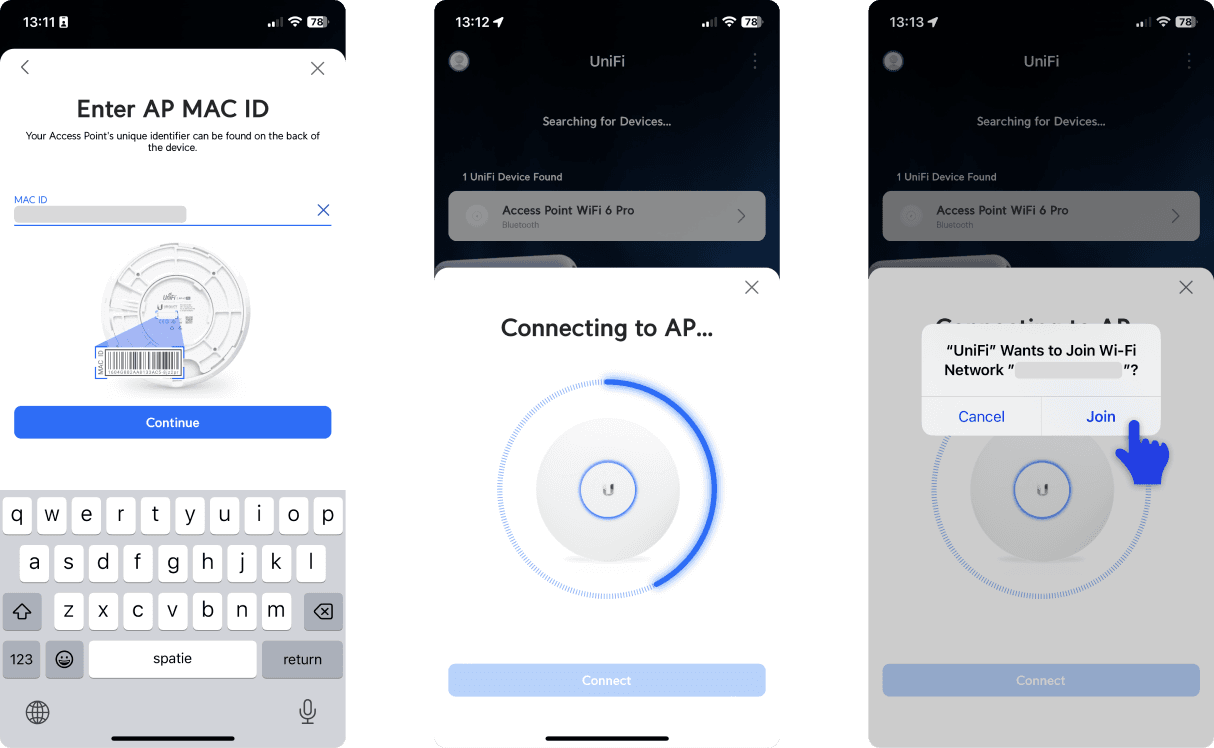
The QR code scanning might fail due to the small print on the device. A workaround could be to use the default iPhone camera app to copy the QR code text, as it might work better. The code is also printed next to the QR code, albeit not very logically placed. The first line is some kind of date code like
2212G, and the part below that is the access point MAC ID you need. Some characters might be bigger than others; they are part of the ID:In the above example, the MAC ID is
245A4C86D9B1-P19XZi.
-
Proceed to connect to the access point:
- Hit "Join" when you get the dialog: "UniFi" wants to Join Wi-Fi Network "...."
- Wait for the access point to connect to your network.
- If you encounter a "Cannot reach access point" message, ensure the access point is connected to the internet.
- Once connected, it should indicate "AP connected."
Configure UniFi access point
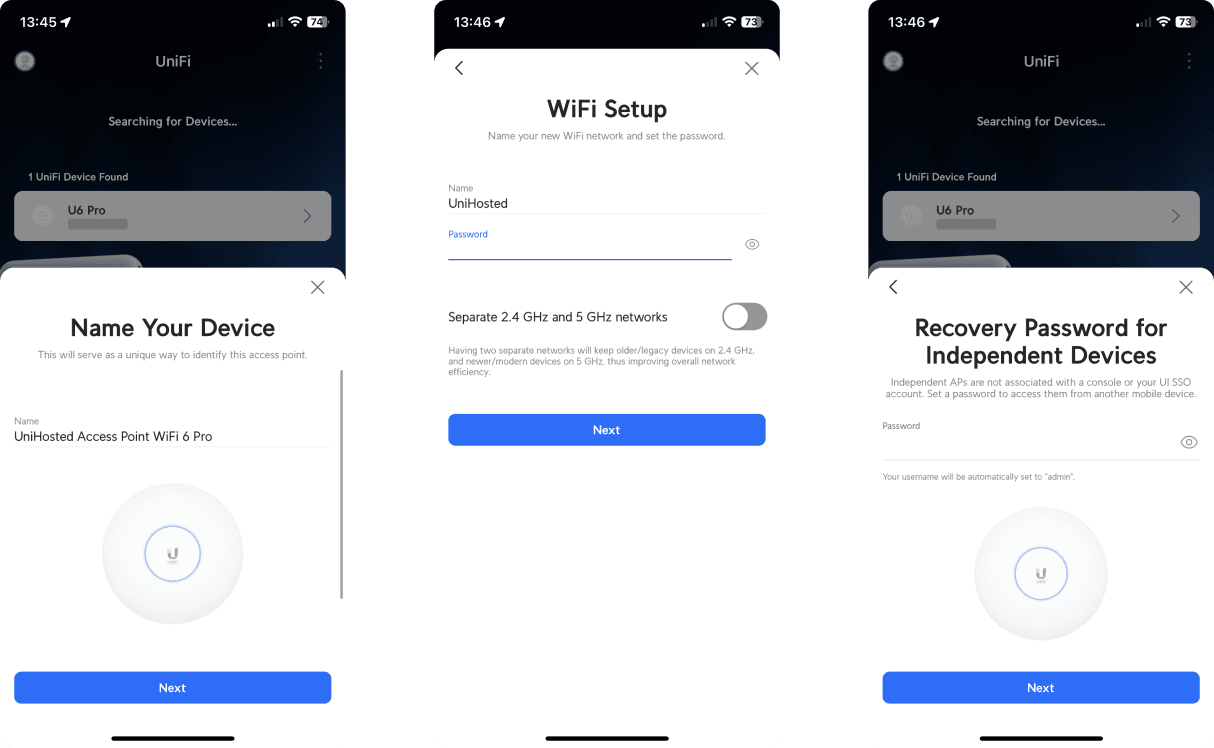
- Assign a name to your device for identification within the UniFi Controller (this is not the Wi-Fi network name).
- On the next screen, set up your Wi-Fi by choosing a name and a password for your network. You have the option to generate separate 2.4 GHz and 5 GHz networks, but by default, this is turned off, and it's recommended to keep it that way.
- After setting up the Wi-Fi, you'll be provided with a "recovery password for independent devices." Since this access point is not connected to your UniFi account, it's essential to copy this password and store it in a safe place. This password allows you to access this access point later from another device.
- Wait for the "Adding access point" process to complete, which should take a few minutes.
Join Wi-Fi network
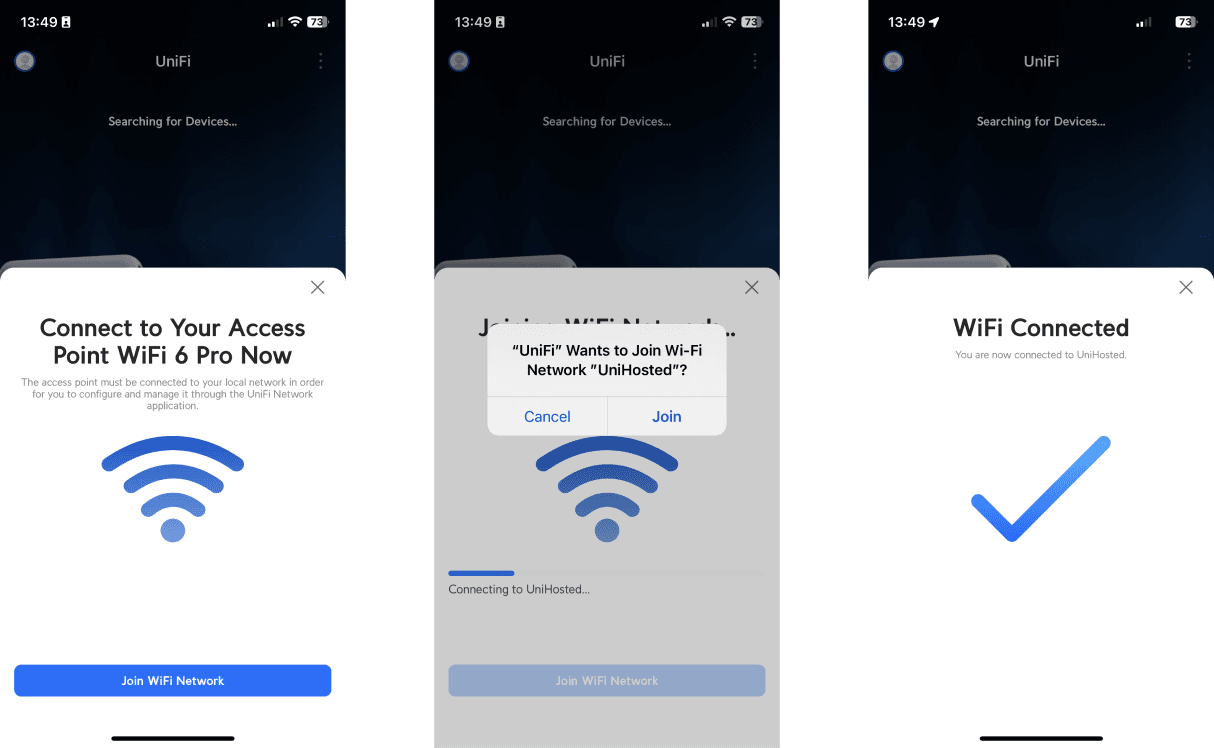
Steps on iOS to join the Wi-Fi network
- Now, connect to your access point by hitting the "Join Wi-Fi network" button and then "Join" on the iOS dialog that appears.
- Once connected, the screen should indicate "Wi-Fi connected."
You're all set! Your new UniFi access point is now configured and ready for use.
We host UniFi Controllers in the Cloud
Are you ready to take your UniFi Network to the next level? Deploy a UniFi Cloud Controller in minutes and manage your network from anywhere.
Free tier available
Get the best support
Join 1276+ customers
No credit card required