Setting up administrators in UniFiOS
Setting up administrators in UniFiOS
A complete step-by-step guide for managing administrators, roles, and permissions across UniFi OS consoles, the Network Application, and Site Manager. This guide does not include Fabric, it will be covered in another blog.
Available Admin Roles
UniFi provides the following predefined admin roles. Their availability may vary slightly depending on your console firmware and UniFi OS version.
Predefined Roles
Owner
- The account that originally set up the UniFi OS server.
- Holds the highest level of access. Certain functions are exclusive to the Owner and cannot be performed by any other role.
- There is only one Owner per console.
- Cannot be demoted; ownership can only be transferred.
Super Admin
- Full administrative access to the UniFi OS server, including the Network Application and the Control Plane.
- Can manage all settings, configurations, and other admin accounts.
- Excluded from a small set of functions reserved exclusively for the Owner (e.g., factory reset, ownership transfer).
Site Admin (Network)
- Has administrative authority to configure settings for specific sites.
- On multi-site consoles, this role scopes management to the assigned site(s) only.
View Only
- Read-only access to monitor the system and view data.
- Cannot make any configuration changes.
- Ideal for auditors, managers, or monitoring-only staff.
- View-only access is available for the Network Application and the Control Plane.
Hotspot Operator (Network)
- Permissions limited to managing guest WiFi hotspots. Can only authorize or deauthorize devices; cannot reconnect or block them.
- Cannot modify network infrastructure, VLANs, firewall rules, or any other settings.
- Ideal for front-desk staff or customer service representatives who manage guest access.
Per-Application Permissions
UniFi OS allows granular, per-application permission assignments. For each application installed on your console, you can assign one of these access levels per admin:
| Level | Description |
|---|---|
| None | No access to the application |
| View Only | Can monitor the application but cannot change any configuration |
| Full Management | Full administrative control over that specific application |
Application-Specific Capabilities
| Application | Available Roles / Granularity |
|---|---|
| UniFi Network | Full Management, Site Admin, Hotspot Operator, View Only, None |
| UniFi Control Plane | Full Management, View Only, None |
Important - about the default site
Every UniFi OS console ships with a default site (on my test server, that's
UOStest0). Don't use it, leave it empty. That means two things:
- Don't deploy anything into it. Keep your devices, VLANs, and configurations on named sites you create yourself, not on the default site.
- Don't scope admins to it. When inviting administrators and assigning per-site permissions, skip the default site entirely.
The default site carries some unique configurations and inherited behaviors that the other sites don't, which is exactly what causes the UI quirks you'll see further down (missing role suffixes, odd scoping). I deliberately avoid the default site in every example below, and I'd recommend you do the same in your own environment.
Adding Admins via Site Manager
Prerequisite: The target Admin must already have a UI Account, created at account.ui.com.
For these examples, I'll use a UniFi OS server with three sites.
In this first example, we will grant full admin or "Full Management" access for an entire server.
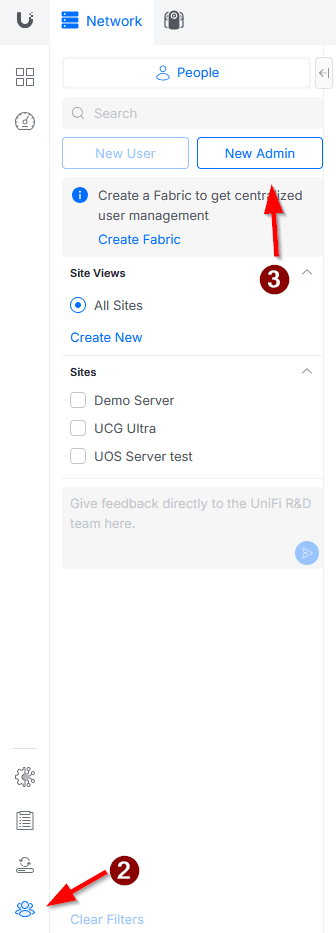
- Log in to Site Manager.
- Select People from the left navigation bar.
- Click New Admin.
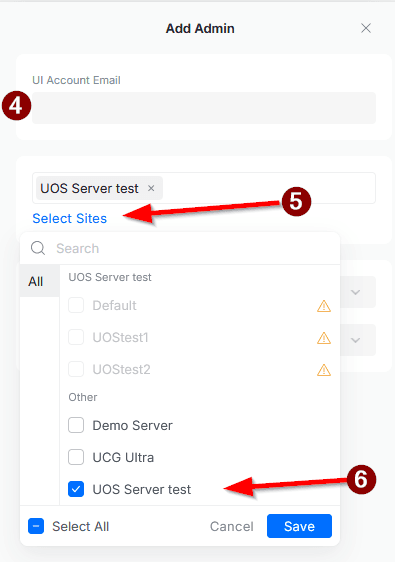
- Enter the email of the admin (registered as a UI Account).
- Click Select Sites, then scroll down to Other.
- Select the server you want to grant access to. You will note that all the sites will be greyed out and will have a warning next to them.
- Assign permissions per application. You can choose here to grant full access to only the Network Application and/or the Control Plane. In this example, we will grant both.
- Confirm and click Add at the bottom.
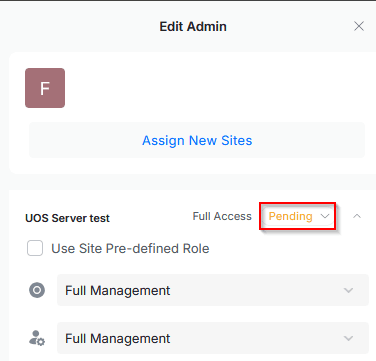
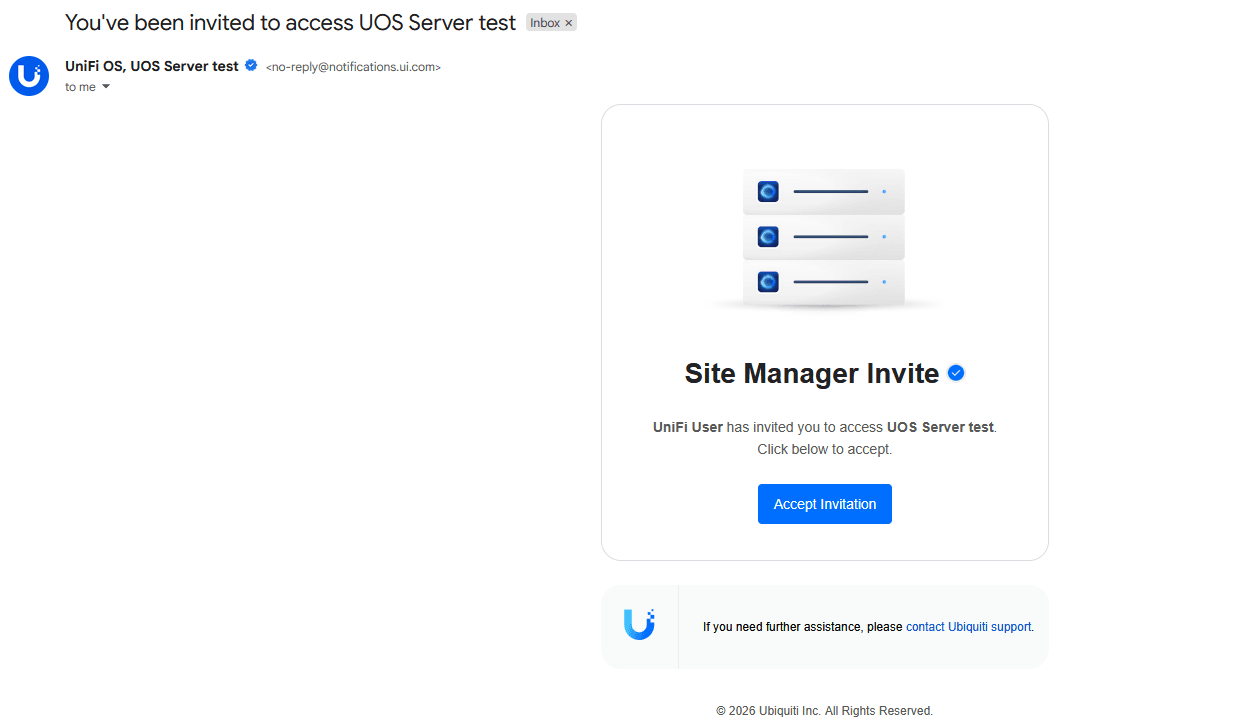
Once you add the admin, you should see a small window with a green checkmark. The admin will receive an email with the invitation, which they need to accept. You should see them show up as pending in Site Manager.
The invite email looks like this:
That's it!
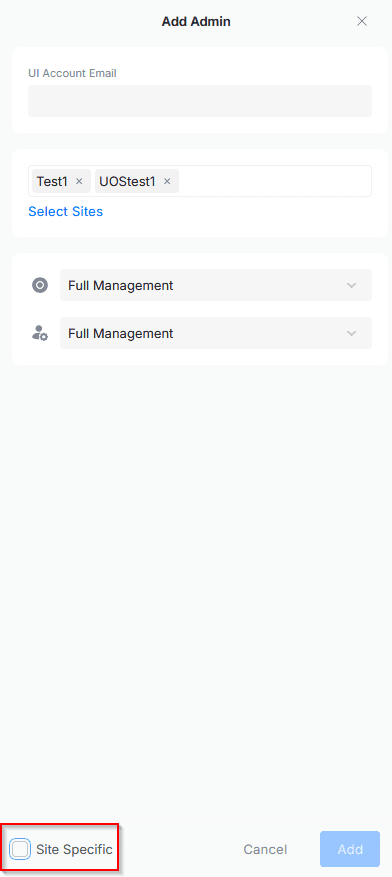
The Site Specific Checkbox
When adding an Admin to multiple sites, the Site Specific toggle allows per-site permission variance. This is the only mechanism for differentiating access across sites.
Let's do another example. This time, I'll invite an admin to just a few sites, granting different permissions per site, and I will not grant Control Plane permissions.
- Log in to Site Manager.
- Select People from the left navigation bar.
- Click Create New and then Create New User.
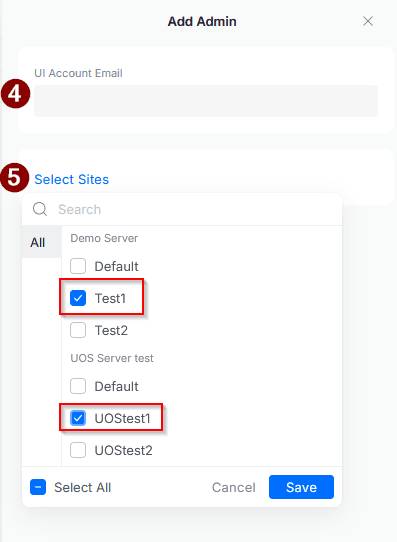
- Enter the email of the admin (registered as a UI Account).
- Check the Admin checkbox.
- Click Select Sites. For this example, I'll choose just one site per server: "Test1" from "Demo Server" and "UOStest1" from "UOS Server Test," then click Save.
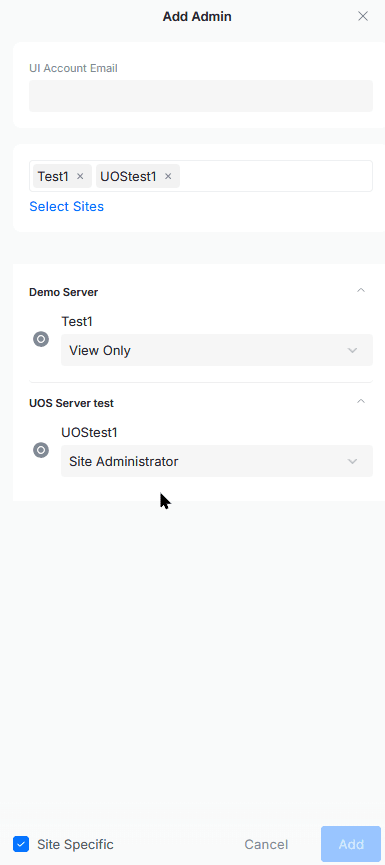
- You will now see that for the two sites we selected, we can choose permissions for the Network Application and the Control Plane. What if we want to assign different permissions for the user on each site for the Network Application? That's when the Site Specific checkbox comes in.
- I'll add View Only permissions for the Test1 site, and Site Administrator for UOStest1.
- That's it! Now wait, what about the Control Plane permissions? Here's a bug in Site Manager: we didn't choose any, and you may think, "well, if we didn't choose anything, that means no permissions were granted." That's not correct. If we go to the Control Plane of the server, the user will be listed as a Control Plane admin with full permissions!
- To remove this, click on the Control Plane permissions and change from Full Management to View Only or None for this example.
Adding Admins Locally (Remote Management Enabled)
Prerequisite: The target Admin must already have a UI Account, created at account.ui.com.
Sometimes Site Manager is not working, or you simply prefer to access the console/server directly. The process to manage admins is almost the same here, with some interface differences.
- Log in to the UniFi OS server/console using the IP or FQDN.
-
Select People from the left navigation bar.
-
Click Create New and then Create New User.
-
Enter the first and last name, then the email. Check the Admin checkbox.
-
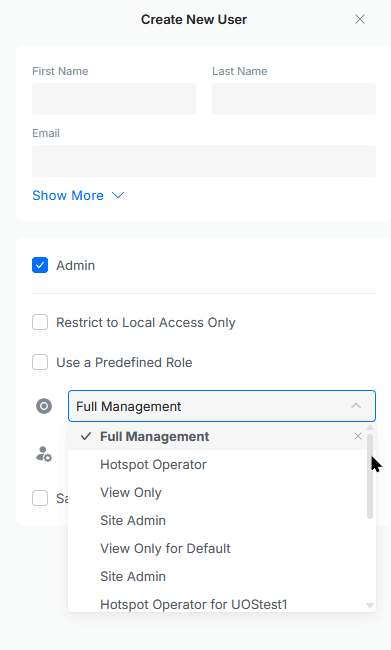
Here we can grant the default Super Admin permission, just as with Site Manager. But what about Site Specific? There's something strange here, the sites are not listed the same way as in Site Manager. There's an odd UI behavior. If we uncheck the Use a Predefined Role option and click on the Network Application permissions, the dropdown will appear.
-
Notice anything weird? Yes, we have two problems here:
-
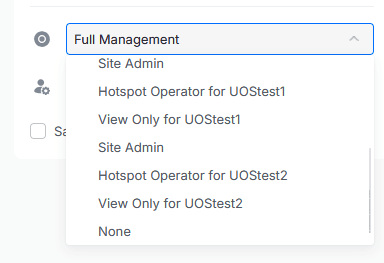
The roles for the Default site (in my case, UOStest0) don't show the site suffix next to them. The only one that's correctly labeled is "View Only." For the other sites, the suffix is correct, almost.
-
The Site Admin role is repeated, but it's actually not! The problem is that it's missing the suffix for all the sites. The other roles don't have this problem (except for the first site). For example, we can see "View Only for UOStest1" and "Hotspot Operator for UOStest1", for those two, the site is added as a suffix, but not for Site Admin. So keep this in mind when adding admins with Site Specific permissions. The secret is the order: for the default site, Site Admin will be the fourth option from the top; for the other sites, it will be the one above Hotspot Operator with the suffix of the site.
-
-
Once you've selected the roles you want to add, just hit Create. Same as above, the admin will receive an email with the invitation.
Adding Admins Locally (Remote Management Disabled)
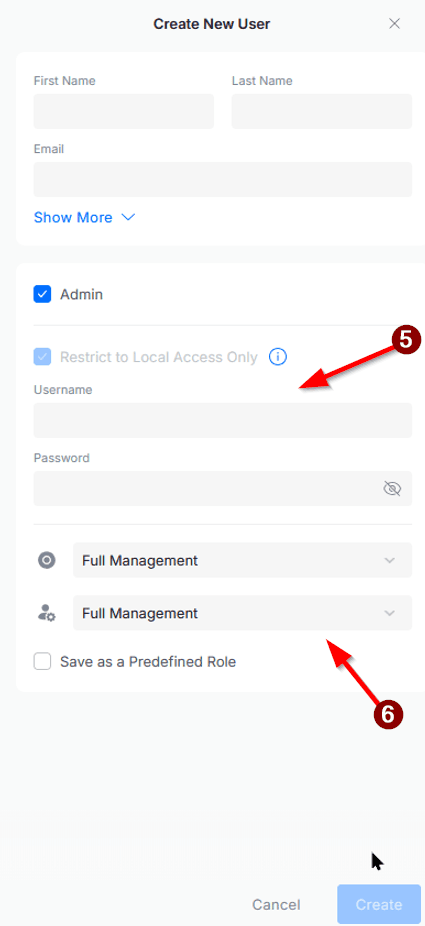
The process is pretty much the same as above. The only difference is that you create the username and password for the user manually.
- Log in to the UniFi OS server/console using the IP or FQDN.
- Select People from the left navigation bar.
- Click Create New and then Create New User.
- Enter the first and last name, then the email. Check the Admin checkbox.
- Type the Username and Password for the new admin.
- Choose the roles you want to grant, then hit Create. That's it!
Creating Custom Roles
You can choose to create custom roles. There are two methods: via Site Manager (which requires Fabric and will be covered in another blog), or locally on the UniFi OS Server. The method below describes the local approach:
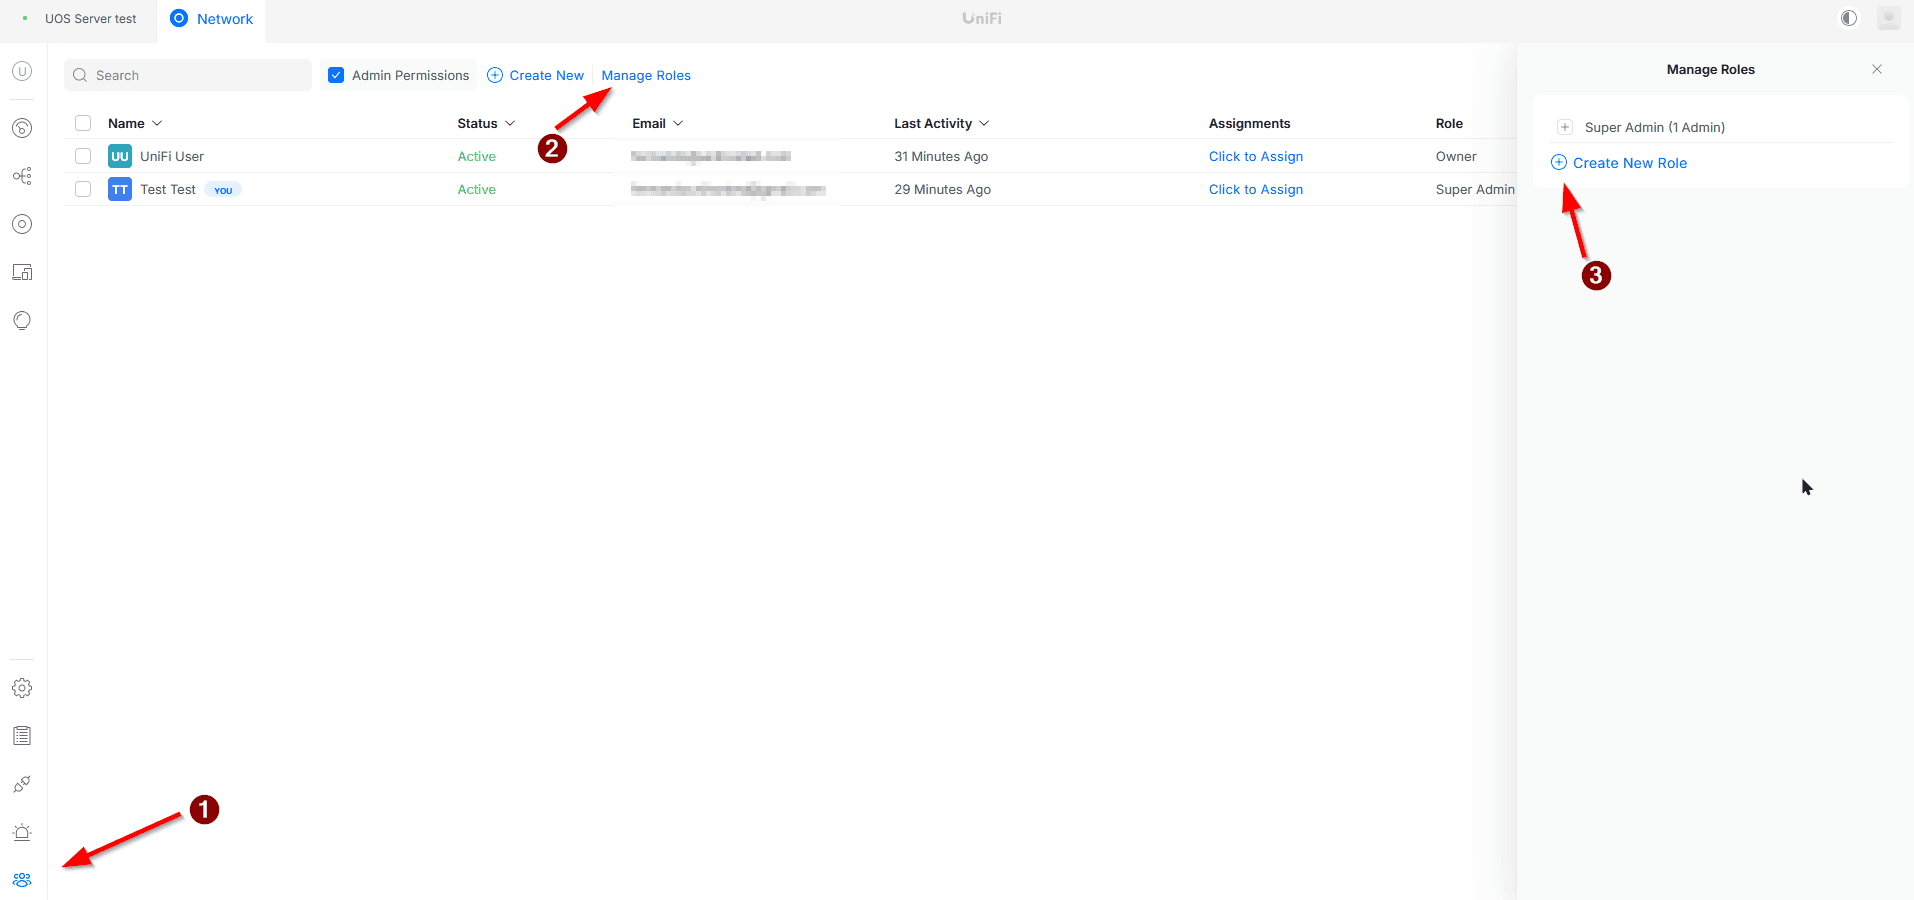
- Select People from the left navigation bar.
- Click Manage Roles.
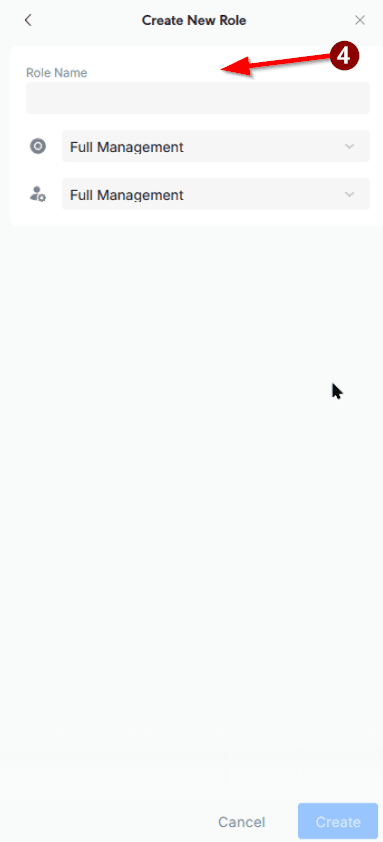
- On the right side, click Create New Role.
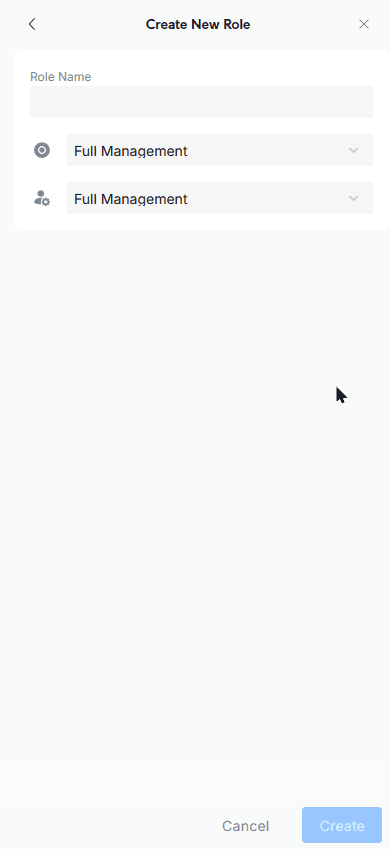
- Enter the role name and select the Network Application and Control Plane permissions. The same permission structure applies as when you add a new admin, you can choose Full Management or granular access per site. Once you finish, hit Create.
- The role will now be available as a Predefined Role when you add a new user, or you can assign it to any user that's already created.
Wrapping Up
And that's everything you need to set up administrators in UniFi OS. A quick recap of the key takeaways:
- Layered permissions, not just roles. UniFi OS combines predefined roles (Owner, Super Admin, Site Admin, View Only, Hotspot Operator) with per-application and per-site granularity. If the defaults don't fit, you can build custom roles locally on the console.
- Two paths to the same destination. Site Manager (
unifi.ui.com) gives you centralized, multi-server control; the local console UI handles direct, per-server administration. The result is equivalent, but the interfaces differ in ways that matter when you're assigning Site Specific permissions. - Watch the two gotchas I hit while writing this:
- In Site Manager, leaving Control Plane permissions unselected does not mean "none" — the admin can silently inherit Full Management. Always verify in the Control Plane after inviting.
- On the local console, the Site Admin label is missing its site suffix. Remember the ordering trick: fourth option from the top for the default site, and the unlabeled entry above "Hotspot Operator for <site>" for the rest.
- Leave the default site empty. Don't deploy configs into it and don't scope admins to it — its unique configurations are what cause the quirks above. Use named sites instead.
One last note: this guide deliberately skips UniFi Fabric, which unlocks custom role creation through Site Manager and a few extra scoping options. That deserves its own post, it's coming next.
If this saved you a support ticket or two, pass it along to your team. Thanks for reading, and happy networking.
When does Managed UniFi hosting make more sense?
Managing UniFi at scale introduces operational risk: inconsistent versions, manual backups, expiring certificates, and hardware failures. Many MSPs move to hosted UniFi controllers to centralize infrastructure while retaining full network control.
If you’re tired of managing controllers yourself or need better tools for remote sites, we built UniHosted to solve exactly that. Our managed UniFi hosting services include debug tools and remote access out of the box, letting you focus on the network instead of the server.