How to Set Inform in UniFi: Step-by-step
How to Set Inform in UniFi: A Step-by-Step Guide
When your UniFi devices are on the same VLAN as your UniFi Network Application (also known as the "controller"), adoption is practically hassle-free. The device announces itself by sending a broadcast message over the local network, the controller detects it, and it immediately shows up in your dashboard as "Pending Adoption."
But what happens when the controller is on another VLAN? Or perhaps in an entirely different physical location, like another datacenter or hosted in the cloud like UniHosted?
Since the device cannot reach the controller locally via broadcast, we need to explicitly tell the device where to find it. That is where the set-inform command kicks in. With this command, we tell the network device exactly where the controller lives. This process is called remote, or Layer 3, adoption.
Another scenario where the set-inform command is a lifesaver is if you change the IP or FQDN of your existing controller. The devices are already adopted, but because the address changed, they need to be repointed to the new location.
Prerequisites
1. Unrestricted Connectivity over TCP Port 8080 The UniFi device and the UniFi Network Application must have unrestricted connectivity over TCP Port 8080. What does this mean in practice?
- If your Network Application is at another site behind a firewall, you must ensure TCP Port 8080 is port-forwarded from the gateway to the internal server hosting the application.
- If the Network Application is hosted in the cloud with a public IP, you must ensure the port is open in your cloud provider's network security/firewall rules.
(Note: With UniHosted—which operates as a "Controller as a Service"—this routing is already handled for you. You don't have to deal with opening firewall ports or managing cloud provider security groups.)
2. Factory Default State The device needs to be in its factory default state. This is critical for adoption. If the device was previously adopted by another controller, you will need to manually reset it via the physical reset button or via SSH.
Let’s get hands-on. Here is how to set the inform address on UniFi network devices step-by-step.
Setting the Inform URL in UniFi
1. Access the Device via SSH First, you need to access the device using SSH. The default SSH credentials for unadopted UniFi network devices are typically:
UniFi Independent Gateways:
User: rootPassword: uiorubnt
UniFi Network Devices (Access Points & Switches):
User: uiorubntPassword: uiorubnt
If the device was previously adopted to a controller, these credentials will be different. You can find your specific SSH credentials in your UniFi dashboard under UniFi Devices > Device Updates and Settings > Device SSH Settings. If you don't have access to that original controller, just reset the device to factory defaults.
You can use any SSH client. If you are on Windows, you can use PowerShell or a third-party tool like PuTTY. In the example below, I am using PowerShell to connect to a USW Lite PoE switch.
Wait, what if I don't know the IP of the UniFi device?

No worries, I've got you covered. You can use the Ubiquiti WiFiman App! It is available for Windows, macOS, Linux, Android, and iOS. Just ensure the device running WiFiman is on the same local network as the UniFi device you want to discover. Below you can find the links to download the WiFiman app:
https://ui.com/download/app/wifiman-desktop
https://apps.apple.com/us/app/ubiquiti-wifiman/id1385561119
https://play.google.com/store/apps/details?id=com.ubnt.usurvey
2. Execute the Set Inform Command Once logged into the device via SSH, use the following command to set the inform URL:
set-inform http://[controller_ip_address_or_fqdn]:8080/inform
Replace [controller_ip_address_or_fqdn] with the actual IP address or FQDN of your UniFi Controller. This command instructs the device to reach out and initiate the adoption process.
In the example below, I set the inform address to point to my free-tier UniHosted controller:
3. Adopt the Device That's it! Now go to your UniFi Network Application. The device should appear in your device list. Just click on it and select "Adopt."
Troubleshooting with the info Command
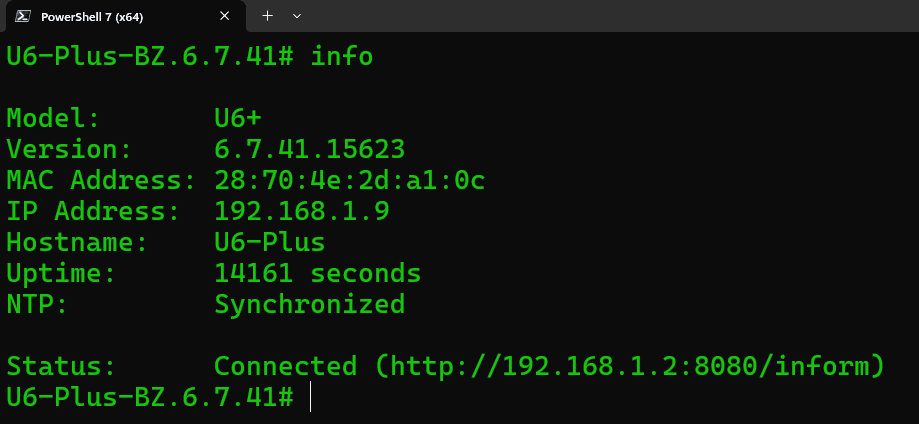
If your device doesn't show up in the controller after running the command, stay in your SSH session and type:
info
This will tell you exactly what the device is seeing. If it says Status: Connected, you are good to go. If it says Status: Timeout or Server Reject, you likely have a firewall blocking port 8080 or a typo in your URL.
Automating the Process: DHCP & DNS Options
That is great for one or two devices, but what if you need to deploy several? Is there a way to automate this? Yes! Automating the set-inform process in larger deployments saves massive amounts of time and reduces manual configuration errors.
DHCP Option 43 This allows network administrators to specify the inform URL as part of the DHCP offer. It automatically directs devices to the UniFi Controller the moment they plug into the network and request an IP address.
- The value for Option 43 is typically formatted as an IP address, pointing to something like
http://192.168.1.10:8080/inform. - Check your specific DHCP server's documentation, as the configuration steps vary between vendors, this can only be used with the IP address, using FQDN is not allowed.
Setting a DNS Record
By default, a factory-reset UniFi device will always search for a DNS hostname simply called unifi. If you configure your local DNS server with an 'A' record that resolves unifi to the IP address of your remote controller, the device will automatically reach out to http://unifi:8080/inform without you having to configure anything.
You can see a practical example of these automated methods in this video tutorial:
Summary
Successfully adopting Layer 3 UniFi devices all comes down to ensuring the hardware knows exactly where your controller lives. Whether you are using the manual set-inform command via SSH for a single stubborn switch, or automating an entire building rollout using DHCP Option 43 and DNS 'A' records, establishing clear communication over TCP port 8080 is the key. Master these methods, and remote adoptions will become a frictionless part of your deployment workflow.
When does Managed UniFi hosting make more sense?
Managing UniFi at scale introduces operational risk: inconsistent versions, manual backups, expiring certificates, and hardware failures. Many MSPs move to hosted UniFi controllers to centralize infrastructure while retaining full network control.